Key takeaways
- Match your edger grit sequence to your big machine scratches to avoid “halo” edges.
- Do not skip grit jumps… it often shows as swirls, patchiness, or a blotchy finish.
- Dust control matters for health as well as clean up.
- Know when a screen and recoat is enough, full sanding removes wood you cannot put back.
- Plan your finish system first… water-based, oil-based, and hardwax oils behave differently.
- Lighting is a quiet secret weapon… side light shows marks before the finish does.
Who this guide is for (and when not to sand)
This guide is for homeowners taking on a careful floor project, usually solid hardwood, or engineered boards with a thicker wear layer, where the condition of the floor is mainly surface wear, scratches, or tired finish.
But sanding is not always the answer. People often default to “sand it all back” because it feels like the proper renovation move. So, it helps to pause and check what you are working with first.
Avoid sanding or get a professional opinion if you suspect any of the following:
Very thin engineered wear layer, deep cupping or crowning, severe water damage, loose parquet blocks (including an oak parquet floor where blocks have started to move), rot, or old adhesives you are unsure about. If you think there is asbestos-containing materials in older adhesives or coatings, do not disturb them… get advice first.
Consider a pro if you have black pet urine staining, big height transitions, stairs, an uneven subfloor, or lots of patch repairs where colour matching matters.
Decide: recoat vs screen and recoat vs full sanding
A full sand and refinish is not “better”, it is simply more aggressive. But if you choose the wrong approach, you can waste time, money, and timber.
Recoat (finish intact, dullness only)
If your hardwood floor looks tired but the protective finish is still intact, a recoat may be enough. You clean thoroughly, lightly abrade if required by the product system, then apply a fresh coat. This is normally the least disruptive option.
Screen and recoat (light abrasion)
If you have light scratches but the finish is still present, screening (a light abrasion with a buffer and screen) can key the surface so a new coat bonds and looks even.
Full sand (finish worn through, deep scratches, colour change)
Choose full sanding if you find the finish is worn through to bare timber in traffic lanes, you have deep scratches, you want to change colour, or you need to level the floor.
Quick diagnostic: the water drop test
In a discreet, small area, place one drop of water. If it beads, the finish is likely still protecting. If it darkens quickly and soaks in, the finish may be compromised. Wipe it up straight away.
Tools, materials, and safety gear (with alternatives)
Must-have tools
Most DIY sanding jobs use a drum or belt sander for the main field, an edger for the perimeter, plus a corner tool (detail sander, disc sander, or a sharp scraper). A vacuum is essential, HEPA preferred, plus microfibre cloths for the final wipe down.
If you are nervous about a drum machine, a random orbital floor sander is slower but more forgiving, especially for first timers.
Consumables
You will need abrasive papers and belts in multiple sandpaper grits, wood filler, optional stain, and a finish system (plus applicators such as a pad or roller depending on the product).
Safety is non-negotiable
Wood dust can cause serious health problems. UK HSE notes wood dust can cause asthma and that carpenters and joiners are around four times more likely to contract asthma than other UK workers. Hardwood dust is also classified as carcinogenic, so treat dust control as part of doing the job properly.
Prep work (the part that makes sanding look “pro”)
Sanding is the visible part, but prep is what stops the finish from looking nearly right.
Clear & protect
Remove furniture, and take doors off if needed. Cover vents and returns, seal doorways with plastic sheeting and painter’s tape, and protect nearby carpet edges if you are sanding a hallway that meets carpet.
Plan your exit path, too. It is easy to finish in a corner on the last coat, and that’s not what you want!
Inspect the whole floor
Look for nails, staples, loose boards, squeaks, cupping, and any signs of wax or silicone contamination from old polishes. Set nails below the surface, replace any damaged boards, tighten loose planks, and tackle stains before you start sanding.
Room conditions
Temperature & humidity will affect finishes. If you have any moisture concerns whatsoever, stop and address the cause before carrying on. A beautiful new wood floor finish over an ongoing damp problem won’t end well.
Pick your sanding plan (grit sequence & direction)
This is where many guides are really vague. But your grit plan and sanding direction decide whether the floor looks calm and even, or busy and scratchy.
Grit sequence (baseline options)
Your starting grit depends on the old finish thickness and the floor’s flatness. Here are three of the most common sequences you can try:
Light refresh: 60 grit, then 80 grit, then 100 grit (sometimes 120 grit).
Typical refinish: 36 grit, then 60 grit, then 80 grit, then 100 grit.
Heavier removal or uneven boards: 24 or 36 grit, then 60 grit, then 80 grit, then 100 grit (sometimes 120).
The mistake is jumping too far, for example, from 36 straight to 100. Those coarse scratches do not disappear… they just hide until the stain or sheen highlights them. Therefore, treat each grit as the stage that removes the marks from the previous grade.
If you want a deeper professional reference, the NWFA sanding and finishing guideline is a helpful.
Sanding direction rules
For many wood floors, sanding with the grain will give you the cleanest result. If the boards are uneven and you need to level the floor, some pros start with a diagonal first pass, then return with the grain for later grits.
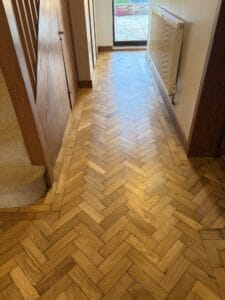
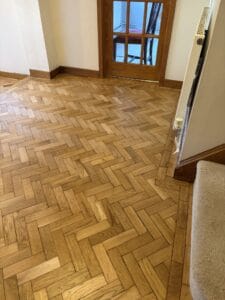
Special cases like parquet and end grain need extra care because grain direction changes.
Edge sanding plan
Your edge work should match the main sanding. If your main floor sander goes 36, 60, 80, 100, your edger should follow a similar pattern, or you risk “picture framing”… for obvious reasons.
Step-by-step: sanding hardwood floors (the core how-to)
Step 1: Start with the main field (drum or belt sander)
Start moving forward before lowering the drum, and always lift it before stopping. Overlap passes ever so slightly, keep your pace steady… change belts or paper when its starts todull.
Drum marks and gouges happen when you pause, tilt, or push too hard.
Common mistakes: Stopping with the drum down, rushing, or trying to “save time” by pressing harder.
Step 2: First cut complete, vacuum and inspect
Vacuum slowly, then inspect under strong side lighting. Mark the remaining finish spots with a pencil.
Missed finish patches can show as colour differences after you apply your stain or seal.
Skipping inspection because the floor looks “mostly fine”.
Step 3: Repeat passes with medium grit
Move to the next grit and sand to remove the previous scratches, not to remove extra wood.
60 grit removes 36 grit scratches… it is not meant to “perfect” the floor on its own.
The common mistakes we see is leaving deep scratches because the medium stage was rushed.
Step 4: Edge sanding (edger) without swirl marks
Keep your edger moving, feather pressure, and blend into the field. Follow the same grit logic as the main sander.
Swirls & halos are most visible when the finish reflects light.
The problem we see here is holding the edger in one spot or using mismatched grits.
Step 5: Corners, under radiators, stairs (detail work)
Use a scraper for tight corners, or a small disc or corner sander with the same grit progression.
Corners that are not evenly sanded can take on stain differently.
Over-sanding edges and corners because a small tool feels harmless.
Step 6: Final sanding pass (fine grit)
Finish with 100 grit, sometimes 120 grit, depending on the system and whether you will stain. Aim for a uniform scratch pattern.
Consistency is what makes the finished floor look smooth.
Sanding too fine before staining, which can reduce stain absorption.
Step 7: Buff or screen (if your system calls for it)
A light screen can refine the scratch pattern and help the finish look clearer.
It reduces visible sanding marks in certain lighting.
Overdoing it and creating uneven abrasion near edges.
Step 8: Final clean to a dust-free standard
Vacuum edges, baseboards, and the whole floor twice. Then wipe with a clean microfibre in the direction of the grain.
Leftover sawdust becomes grit in your new finish.
A quick vacuum and a single wipe, then wondering why the finish feels rough.
Filling gaps and repairs (timing matters)
Filler can make a wood floor look beautifully finished, but it can also crack if you use it where the floor moves seasonally.
Two common options:
- Fill after medium sanding, which helps trowel fill bond to freshly sanded timber.
- Fill after the final pass, which is good for spot-filling nail holes and small gaps.
Use the right type and colour of wood filler for the job. Do not overfill large gaps… Expansion gaps in your wood floor are there for a reason… expansion & contraction can push filler out later.
Stain (optional): how to get even colour
Stain can look stunning, but it can also highlight patch repairs and natural variation in hardwood. If your floor has mixed timber, the stain may make differences more obvious rather than hiding them.
If you do stain, apply evenly, keep a wet edge, and avoid lap marks. Test first in a small area, then check it in daylight and evening light before you commit.
Sealing and finishing (what most DIY guides under-explain)
This is where the floor becomes livable. Sanding makes it look good, but finish makes it last.
Choose your finish system
Water-based polyurethane dries faster and stays clearer. Oil-based polyurethane can add warmth and ambering over time, but it smells stronger and takes longer to cure. Hardwax oils can look beautiful, but they have different maintenance expectations, and you need to follow the care plan.
Application steps
A typical system is seal coat (if used), then denib or screen, then 2 to 3 topcoats. Edge in first, then roll or pad out while keeping a wet edge.
The temptation is to go back and fix tiny marks while it is drying. But that often makes things worse. Therefore, apply calmly, then address issues between coats if needed.
Curing timeline (clear and practical)
Please remember that dry is nowhere near the same as the finish being fully 0cured. Always follow the manufacturer’s guidance for your exact finish, but as a realistic rule of thumb:
Socks after hours, light foot traffic later the same day or next day, furniture after a few days, rugs after a few weeks. It varies by product and conditions.
Dust control and indoor air quality
Dust is the part that people underestimate. It affects health, clean-up time, and the finish quality.
UK HSE explains the risks and why control matters. For another overview of airborne dust hazards during sanding, see OSHA.
A practical dust minimisation checklist looks like this:
Seal as many doorways that you can, cover up all vents, keep off while sanding, use a HEPA vacuum, empty bags safely, and clean as you go, not just at the end.
If you mention dust containment systems, keep performance numbers clearly labelled as manufacturer claims. Bona’s DCS marketing materials cite up to 99.99% dust removal in supported setups.
Cost, time, and is DIY worth it? (UK-focused)
Costs will vary by region, room shape, stairs, repairs, and the condition of the floor.
For UK benchmarks, these guides are useful:
- Checkatrade cost guide.
- MyBuilder cost guide.
- Homebuilding and Renovating cost range context.
DIY cost checklist: floor sander rent, edger rent, abrasives, finish, applicators, PPE, and disposal. The hidden cost is risk cost, if a mistake means you need to resand part of the floor.
Time-wise, most rooms break down into prep day, sanding day or days, finishing days, then cure time. A bedroom often feels simpler. A hallway with lots of edges and doorways tends to take longer than expected.
Troubleshooting and common mistakes
Drum marks or stop marks
Problem: visible dips or bands in the floor.
Cause: stopping with the drum down, inconsistent pace.
Fix: resand the area through the correct grit sequence, feather edges.
Edger swirl or halo
Problem: swirls near the perimeter, or a visible “frame”.
Cause: holding the edger still, too much pressure, grit mismatch.
Fix: lighten pressure, keep moving, match grit sequence to the field.
Chatter marks
Problem: repeated ripples or vibration marks.
Cause: dull abrasive, machine vibration, moving too fast.
Fix: change paper, slow down, resand with the correct grade.
Uneven stain or blotching
Problem: patchy colour after stain.
Cause: inconsistent scratch pattern, poor clean down, and timber that needs conditioning.
Fix: resand to a uniform scratch, vacuum properly, test stain again.
Finish bubbles or lap lines
Problem: visible lines where sections overlap, or small bubbles.
Cause: overworking the finish, losing the wet edge, applying too thickly.
Fix: allow to dry, denib or screen as recommended, apply next coat calmly.
Peeling or adhesion issues
Problem: finish lifts or flakes.
Cause: wax or silicone contamination, applying too soon, product incompatibility.
Fix: identify contamination early, strip back properly, and recoat within system guidance.
When to hire a pro (and what you should ask)
Sometimes the best choice is hiring a contractor, especially if what you want is a flawless finish with minimal disruption.
Ask what they use to contain the dust, what grit plan they will be following, what repairs are included, what finish system they recommend, and what drying and curing expectations look like in your home.
A good quote should really explain prep, the number of coats, repair scope, edges & corners, disposal, and not forgetting any aftercare that they offer.
FAQs about wood floor sanding…
What grit should you start with?
Most sanding starts with 24 or 36 grit for heavier removal, or 60 grit for a lighter refresh, then moves through 80 and 100 (sometimes 120). Start depends on the condition of the floor and the old finish. (See Pick your sanding plan.)
Can I sand engineered hardwood?
Sometimes, but it depends on the wear layer thickness. Very thin engineered boards may not tolerate a full sand. If you are unsure, get advice before you start sanding.
Do I need to sand diagonally first?
Not necessarily… You only need to sand diagonally if you need to level the floor. Many plank floors can be sanded with the grain throughout. (See Sanding direction rules.)
How many times can hardwood be sanded?
It depends on how much timber and what is left above the tongue & groove (or the wear layer for engineered). This is why choosing recoat versus full sand matters.
How do you avoid edger swirl?
Keep the edger moving, feather pressure, and don[’t forget to always match the edge grit sequence to the main sanding so the scratch pattern blends.
How long before I can walk on it or move furniture back?
Follow the finish manufacturer’s guidance. As a practical rule, socks after hours, light foot traffic later the same day or next day, furniture after a few days, rugs after a few weeks.